Monday, September 28, 2009

Expat Baking Tip #2: Silicone Bakeware


To be completely truthful, I'm not convinced I'd go the silicone bakeware route if I didn't have to consider cramming it into a suitcase and lugging it half way around the world. I truly covet Chicago Metallic Bakeware. There's something about those straight sides and sharp corners that give me the hope that my birthday cakes would somehow come out looking professional - no lopsidedness or crumbs in the frosting.

Sigh. I do realize that I have neither the baking skills for professional cakes nor the luggage space to spare for such frivolities. And, as luck would have it for those of us living in the far corners of the earth, there's silicone bakeware!

The colors are very fun! The shapes are varied with a wide range to choose from. And you can always find them marked down in the cooking aisle at your favorite TJ Maxx.

Here's a festive orange bundt I bought in Almaty, Kazakhstan in September of 2005. It holds very fond memories for me as it helped me sharpen my nesting skills as we waited for Baby #1 to come home.

Continuing the fall theme, change up your muffins in an instant with this one.


Silicone bakeware is great for many reasons. It doesn't require butter and flour to ensure your baked goods come out with ease. Just turn your form over after a few minutes, give it a little twist, and out pops your pumpkin muffins or your streusel topped bundt.

But most importantly it goes from this-


to this-

and back to this-

Flexible, bounces back under duress, withstands the heat of the kitchen, cheerful, easy to clean and lightweight. No, it's not me. It's my silicone bakeware.

Wednesday, September 23, 2009

The Best Minestrone-- Hands Down


This is by far the best minestrone I've ever had and I'll never stray from it. I might tweak it a bit, but I'll never abandon it fully. It's from epicurious.com and can be found here. It's odd, because when you do a general search on "minestrone" at their website, you'll get eleven recipes. Ten fit on a page and this recipe, the best in the whole world, four forks and all, resides by its lonesome on the second and last page. It's a hidden gem.

Here's what you need:

It's a long list of items but don't be scared away. And feel free to substitute as required, or leave out some things if you don't have them, like the kale. You can use canned white beans, but I used dried. I cooked those first in the morning.

And here were my two substitutions. These long chinese beans for regular beans. Frozen green beans work very well, too. My heart skipped a few beats when I saw these in the Green Market.

And this, oriental/chinese celery for regular celery.

There are two secrets to this minestrone that I think brings it over the top. The first is to fry up some sort of pork product: pancetta, bacon, sausage. I'd show you a picture of the first several steps but I was busy chatting away in my kitchen with a friend. More like venting, actually. She has very good ears. Thank you!

At some point, mid-way through, you'll have this. After the bacon was nice and crispy, I added the onions, garlic, celery and carrots.


Then you chop up your green and white vegetables: zucchini, potatoes and green beans.

And shredded cabbage. I doubled the amount because of the missing kale.

All of that goodness cooks down for a few minutes.

And then you add your tomatoes and your broth.


Put a lid on it and simmer for an hour. The soup that is, not you. However, yesterday I could've followed these rules and been better for it.

The second secret to this soup is to puree half the white beans.

It thickens the soup and add a creaminess to it that's divine.

And then add the rest of the whole beans.

If you can, make this the day before you serve it because it's even better the next day. I froze a bunch for the winter and will be thankful to have this on hand when I might not have electricity!

Saturday, September 19, 2009

Tomato Canning Fest 2009


We'd been planning on canning tomatoes for the winter season for a while now. Just waiting for tomatoes to be at their peak and for the prices to drop before setting out on our culinary adventure. Finally, last Thurday was the day to go to the market and buy -- are you ready? --132 pounds of tomatoes! And are you ready for this? For a mere 20 cents per pound!

We bought two big boxes of tomatoes.


While I washed all the canning jars, John washed the tomatoes. He transferred tomatoes to a big plastic basin and washed them in the bathtub. When you're washing 132 lbs of tomatoes, you want to maximize your efficiency quotient. Or something like that.

We used every single large pot, pan and bowl within a 5 mile radius.


We decided to raw pack the tomatoes in their own juices. So John started coring tomatoes and making the puree in the blender.


In the meantime, I was manning the canning operations. I heated the jars and the rings in one pot and the lids in another to 180 degrees, being careful not to boil the lids. If you boil the lids, disaster ensues. The gummy red ring on the lid won't work properly if you boil it. And we all want to reduce our chances of botulism in February in Dushanbe.

We managed to figure out our assembly line, grateful we found an extra table-top electric two-burner stove. We heated the jars in the two big pots and when the water temp hit 180, one by one we took a jar, filled it with citric acid and salt, packed it with quartered tomatoes and filled it with the pureed tomatoes. And then of course, the careful wiping of the rim, the exact placement of the lid, the finger-tight ring twisting and putting back into the water bath.


Once all seven jars were back in the water bath and the water started boiling, we starting counting down our 45 minutes. Once that was reached, we turned the heat off and let the jars hang out for a while to equalize. Sometimes I like to do that, too. Equalize.

We repeated this process I don't even know how many times. I do know that I picked John up at 8.15 am and he left around 4.30 and I finished the last batch around 6.00 pm. I now have a newfound appreciation for cooks that stand on their feet all day long.

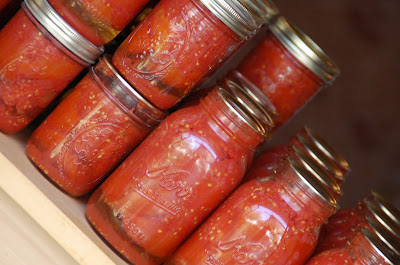
As novice canners, there were definite learning curve issues. After the first batch, we learned to pack the tomatoes tighter to avoid "float". We learned that you can't get all of the air bubbles out and some fact checking on the internet seems to indicate that some are ok as long as you have a tight seal. And all 24 pints and 11 quarts sealed properly.

After sitting untouched for 24 hours, this is what our bounty looks like.


Not bad for a days work.

Wednesday, September 16, 2009

Beer Braised Butternut Squash and Black Bean Quesadillas


Sometimes a recipe finds you, instead of you finding a recipe. And this recipe is an example of that. The inspiration came from a precious bottle of beer, a pumpkin ale to be exact. And let me assure you, you don't find bottles of beer like this in our corner of the world. No, no you don't. Well, except for that time that a Peace Corps Volunteer in northwestern Turkmenistan inexplicably came upon a whole case of Pete's Wicked Summer Pale Ale at a tiny roadside kiosk. He ran back to his home, gathered up all his money and he and his buddy savored it in secrecy for months. Ok, a few nights, max.

But I digress.

So, our friends come over for dinner the other night and bring with them some great imported beer. And with butternut squash doing its thing right now, it seemed only appropriate to build a dish around these two ingredients.


What goes well with beer and butternut squash. Black beans, of course.


Remember the rest of the butternut squash from earlier in the week? Here's where the neck of the squash comes into play. Turn it so the flat bottom is stable on your cutting surface. Glide a knife from top to bottom, shaving the peel off in slices, rotating the squash inch by inch.


Next, slice the nekkid piece of squash into half inch slabs.


Cut each slab into half inch fingers then cut again into half in cubes. None of this was exact measure, but I'd say it was about 3 cups of cubed butternut squash.


In a large saute pan over medium high, heat some olive oil and then add a heaping tablespoon of minced garlic. Saute the garlic until it starts to brown, at which point remove it from the pan with a slotted spoon. You now have garlic infused oil, instead of bitterly burnt garlic.


Add your cubed butternut squash and toss to coat each piece. And then wait. Don't touch! Just wait about 5 - 7 minutes until the underside of each piece is nice and golden. Then shake it all about and do it again. And again.

Until you have this. Caramelized on the outside yet not so cooked that each cube begins to break down into mush. Remove the butternut squash from the pan.


If needed, add a bit more olive oil. Lower the temperature then toss in about a cup of thinly sliced onion to the pan.


Again, be patient. Don't move them around too much. Your goal is to caramelize the onions. It might take about 20 minutes and only moving them around every 4 or 5 minutes. If they start to burn, your burner is too high.

When they are nice and golden, pour in about a cup of your pumpkin ale and turn up the heat to medium!


Add 1 teaspoon of cumin and 1 tablespoon of chili powder.


Mix with about a cup more of beer until well incorporated, then toss in your cooked butternut and about 2 cups of cooked black beans.


Cook this until all parts are heated through and the beer is reduced to a thick sauce of sorts. At this point, you can put this in the fridge for a few days or the freezer for up to six months.

When you are ready to assemble your quesadillas, grab your tortilla. I buy mine in bulk from Al Sham, the arabic restaurant in town. Arabic bread. Tortilla. Flat breads world over are pretty similar. Just like people.


Cover half, or all of, the tortilla with a layer of your squash and bean mixture. Top it with shredded cheddar, minced cilantro and chopped green onion.


Fold it it in half, or add another tortilla on top, depending on which route you went. Put it in a pan over medium high heat.


Find something heavy to put on top. For me, it's my trusty stack of medium and small pots.


Cook this for about 5 minutes on each side, until the cheese is melted and it's golden brown on the outside. Cut into triangles to serve.


Next, your dipping sauce. It's all about the sauce. Mix about a tablespoon of pureed chipotle chilis into about a cup of plain yogurt or sour cream.


And there you have it. Beer braised butternut squash and black bean quesadillas. Ole!