Sunday, January 31, 2010

Going Local: Polenta Pizza with Blue Cheese and Caramelized Onions from Scratch


I've decided to make a recipe once a week that's made from only locally purchased ingredients. No imported goodies, no outsourced delicacies, no suitcase surprises. Every ingredient must have been purchased in Tajikistan; however, it can be imported from elsewhere. I'm calling this category "Going Local". It will push me to use ingredients that I might not readily use otherwise, or at least in inventive and new (to me!) ways.

So, welcome to the first Going Local post!

I went to a fun girls' night out on Friday night. Mixed drinks (very yummy mixed drinks!) were provided and the food was potluck. Wanting to bring something finger food-y, I recalled a polenta pizza I made just about a year ago. We had just arrived to Dushanbe and were living in a temporary apartment with our eight suitcases and little more.

Which is a testament to how easy this is to make! Everything is locally purchased and its a breeze to make.

You need cornmeal, blue cheese, onions, salt and olive oil.


If you aren't familiar with cornmeal, this is what it looks like close-up.


I measured about 3/4 cup of cornmeal and 3 cups of water in a heavy bottomed pan.


Bring it a boil over high heat, and once it begins to bubble stir like mad for about 5 minutes until the liquid is absorbed and the dried bits of ground corn are plump. Once thickened like so, add about 50 grams of crumbled blue cheese, a good pinch of salt and stir to combine.


Spray or lightly coat a pizza pan with oil.


And plop the gooey cheesy mess right in the middle.


Spread the polenta evenly in the pan.


Pop the tray into a 350 degree (177 C) oven for about 20 minutes, until the polenta brightens to a deep gold color and starts to pull away from the edges slightly.


While the polenta is cooking in the oven, thinly slice about 2 cups of onions.


Heat about a tablespoon of olive oil on med high heat in a saute pan and add your onions. To caramelize them, toss the pan to coat the onions in the oil, but then be patient. Let them sit for a good five minutes or even longer before you move them around. If they are browning too quickly, then turn the heat down. Do this for about 45 minutes until they look like this.


Scatter the caramelized onions on the baked polenta. Then take another 50 grams of crumbled blue cheese add that to the top.


Put the pizza back into your 350 oven for about 10 or 15 minutes, or until the blue cheese is oozy and gooey. Let it cool slightly then cut into wedges. Its great both hot and room temp. Easy, delicious AND local.

Happy cooking!


Wednesday, January 20, 2010

Weekend Market Report


Last weekend I introduced a new friend to the second hand market near the train station. It always feels good to share treasured hunting ground with a like-minded hunter!

I love the images of this boxed bulk soap we spotted in the wholesale market where we parked. In fact, I think I could decorate a room around this color scheme.


Is it a coincidence that my favorite ice cream is mint chocolate chip?


Chocolate and caramel. My mind never strays far away from food.


And here are some of the faces of the market. They are hard worn and beautiful.


This man begged me to take his picture and then proceeded to find me later on when he asked me, in Russian, with much hand gesturing, to do something. I think he wants me to print the picture for him or give him my camera. Not sure which.


The find of the day. My new friend and I saw it at the same time and I walked away with it. I'm not sure if she's my friend anymore, although she does speak to me still. It's a large well-used cotton runner. It cost $4.58. Yes, less than five dollars.


Don't you think it works perfectly with the dining chairs my sister recovered for me when she was here visiting?


I bought this little cut crystal tray for a buck or two.


It holds my salt & pepper shakers and dirty olive oil bottle very nicely, don't you think?


And I couldn't pass up this darling little glass bowl. I love the decorative stars on the bottom. Its printed with 60 K on the bottom, which means 60 kopek from Soviet times. I love that!


And adding to my growing collection of very heavy cast iron molds, I couldn't pass this up.


Thanks for watching the Weekend Market Report. Until next time, happy hunting!

Thursday, January 14, 2010

Lipyoshka and Ham & Cheese Pockets from Scratch


Let me introduce you to my nemesis. My arch enemy. My love. My weakness. To us, its heaven. Its lovely. Its delicious. Its even beautiful with its flowery center. But because it goes straight to your hips and its impossible to stop eating it, its the devil in disguise. Its evil.

Its all so confusing, isn't it?

For those of you that do not live in Tajikistan, let me introduce you to lipyoshka (as its known in Russian) or non (as its called in Tajik). Its a traditional bread made in a hot tandir oven. I'll do a post soon on how its made, sold and revered.

This implement is used to make the decorative flower in the center. I believe it allows the round bread to cook evenly without an undercooked center.


In our household, it is an after school tradition to buy one or two lipyoshka on the way home for an afternoon snack. The only way it makes its way home untouched is if its finger-burning hot straight out of the oven. In that case, its delicately tossed back and forth from one hand to the next until I can toss it onto the passenger seat next to me.

Its a communal bread, meant to be broken by hand. Let Sparkly Girl #1 show you how its done! [Please ignore the wonky frames in the background. They've been like that since 1998].


And consumed.


This day I bought one lipyoshka and one "testa", or dough. Uncooked lipyoshka.


The promise that this bag holds for me on a busy day is endless. When dinnertime is fast approaching and not a thing is prepared, this is my Go-To ingredient. Many a pizza has been made with this dough.


Once heaved onto your work surface, knead it a few times into a smooth ball and let it rest for 20 minutes.


Now you can take this in a multitude of directions. Think monkey bread. Think dinner rolls. Think foccacia. Think bread sticks.

After a quick assessment of the contents of a near-empty fridge, I decided to take the ham-and-cheese hot pocket route. I thinly sliced some mozzarella and some fine looking ham.


I divided the dough into four pieces and formed those into dough balls.


Then I rolled each dough ball into a sort of circle, about 6 - 8 inches in diameter.


Then I stacked some ham and cheese in the center.


I folded the narrow sides in, like a burrito.


Then brought the sides in and pinched tightly to seal.


I placed the stuffed dough balls seam side down on a non-stick silpat mat covered cookie sheet and hunted for a warm spot in our cold house. The plug in radiator works just fine.


Cover them with a kitchen towel and let them rise again. This took about 30 minutes. Look, I think that's a female hot pocket on the left.


Then I tossed them into a 350 oven for about 20 minutes until they looked like this.


The girls devoured them. Sparkly Girl #2 ate one for lunch the next day as well and upon consuming the first one she immediately asked for another.

Not bad for a last minute kids' dinner!

Wednesday, January 6, 2010

Meyer Lemon Pistachio Biscotti from Scratch


There are many great things about living in Central Asia, and Tajikistan specifically. High on that list are seasonal ingredients, and right now meyer lemons are doing their thing. To live in this part of the world is to appreciate the seasonality of fruits and vegetables and to take advantage of them when they are available. I'm having fun learning new ways of preserving produce to enjoy beyond the season. And ways of cooking with ingredients that are at the height of their ripeness.

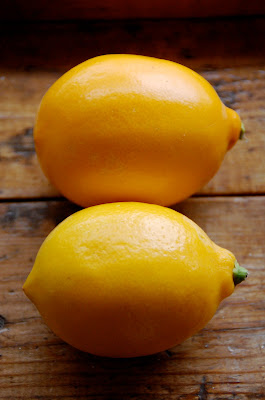
Meyer lemons are a hybrid of a lemon and a mandarin, the latter also being plentiful this time of year. They have beautiful smooth skin and a sweetness to them unlike their sour counterpart. Having both meyer lemons and shelled pistachios on hand, I adapted this recipe from epicurious.com for Lemon Pistachio Biscotti.

The main players. Flour, sugar, baking powder, eggs, lemons, vanilla, pistachios.


After mixing the dry ingredients, add the pistachios.


Mix to combine.


Now grab the lemons and finely grate the peel. If you don't have a microplane, you must buy one right now.


Don't grab an old soviet juicer and use it for the first time ever and not put it over a bowl to juice your first lemon half. Not that I would do that, of course.


Mix the wet ingredients along with the grated lemon peel.


Add that to the dry ingredients.


Now the fun part. Flour the work surface.


Divide the wet dough into two portions, equally sized.


The recipe said to roll these into logs and then pat them slightly to flatten. It was way too wet to do that. I sort of patted them into the shape I thought they should be in directly onto parchment covered cookie sheets.


I baked these quite a bit longer than required. Could be that my oven is off and my dough was wetter than normal. Or because it was Wednesday.


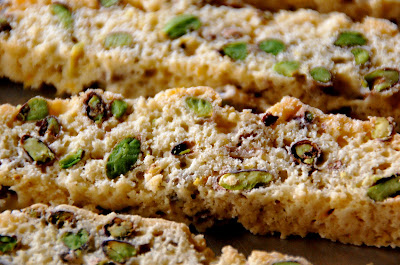
Look at the pistachios popping out. Aren't they gorgeous?


Biscotti are twice baked biscuits, or cookies. Once cooked and cooled completely, the "logs" are sliced thinly and baked again.


Half of them I drizzled (glopped) with some melted white chocolate.


Perfect for dipping in your morning coffee.


Warning! Make sure your shelled pistachios are actually shelled. I had a crunchy surprise this morning. No need to crack a tooth and make a trip to the local dentist.